Key Takeaways
- SIPs require careful planning, especially when it comes to panel sizes, roof lines, and window placement.
- Simple building designs are easier to seal properly and deliver better energy performance.
- Right-size your HVAC and ventilation systems to avoid the inefficiency of oversized equipment.
- Hire a builder with specific SIP experience to ensure the panels are fastened and sealed accordingly.
- Finalize electrical and plumbing layouts before production to avoid costly field modifications.
Energy bills can get out of control. You turn on the heat in January or the air conditioner (AC) in July, and just hope your bill won’t hit the roof. It shouldn’t feel scary to keep your own house comfortable. But for many people, it does.
In most cases, the problem might not be the thermostat, but in the way the house was built. Traditional framing leaves gaps and weak spots that let air slip in and out. Your heating, ventilation, and air conditioning (HVAC) system runs nonstop, while you sit there wondering why one room feels like a freezer and another feels like a sauna. It’s a mess, and you pay for it every single month.
Structural insulated panels (SIPs) provide a different approach. They combine structure and insulation into one solid piece, reducing air leaks and wasted energy. The result is a home that holds its temperature without constant strain.
Here are a few tips on how to design energy-efficient homes with SIPs:
Work With Experienced Professionals
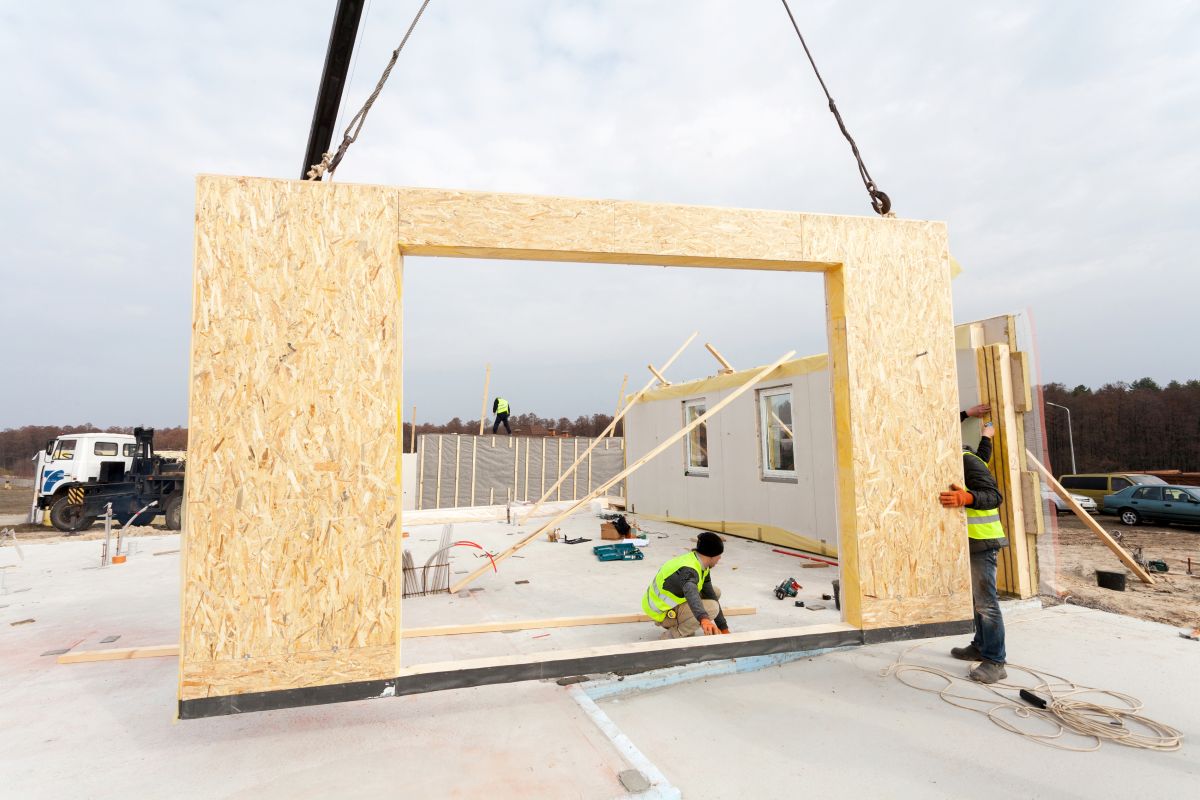
SIP installations look simple, yet not every builder knows how to go about it. Every detail matters. That’s why you want a team that has experience with wall panels. Experienced professionals will know how to handle seams, openings, and load paths.
Ask direct questions. How do they manage panel modifications in the field? How do they handle flashing around windows? What blower door numbers have they seen on past projects? If they can’t answer clearly, that’s a red flag.
SIPs are a full building system. The structure, insulation, and part of the enclosure are tied together, so making a mistake can damage the entire construction. An experienced crew understands shear strength, fastening schedules, and how panels contribute to load capacity. That knowledge affects performance and durability over time.
To make sure everything goes well, find a manufacturer who will help you source and install these structural insulating panels. This way, you’ll reduce costly errors, avoid sloppy sealing work, and stay aligned with local code requirements. You’ll also have someone who can coordinate with engineers, HVAC designers, and inspectors without confusion.
Design Around Standard Panel Sizes
SIPs aren’t cut randomly on site like studs. They’re manufactured in specific sizes. If you ignore that and draw plans without thinking about dimensions, you create extra seams and waste.
Talk to your manufacturer early. Find out the widths and heights of their wall panels. Then, adjust your plans to match. Make sure you align ceiling heights and window placements with those dimensions. A simple shift of a few inches in the design phase can reduce unnecessary cuts later.
Every extra joint adds another location that needs foam sealant and SIP tape. These become a possible weak spot if sealing isn’t done carefully. Designing with standard panel sizes in mind helps control installation costs and keeps the job site cleaner and more predictable.
Keep the Building Shape Simple
Energy performance improves when the house has a compact shape with clean lines and fewer corners. A straightforward roof helps keep the design efficient and easier to manage.
Complex shapes might look impressive on paper, but they increase exterior surface area. More surface area means greater exposure to outdoor temperatures and better opportunities for air infiltration. With SIPs, complicated geometry also requires extra panel modifications and more connection details that must be sealed and fastened correctly.
A rectangular footprint, paired with a simple roof, on the other hand, should be easier to seal and insulate well. The building enclosures stay tighter because there are fewer transitions between walls and roof sections.
Structural performance improves as well. This is because panels carry loads more effectively when they remain large and continuous instead of being cut into small sections to follow a zigzag layout.
Plan Mechanical Systems for a Low-Load Home
A tight, well-insulated SIP home doesn’t behave like a typical house. Heating and cooling loads are often lower because the insulated foam core and continuous insulation reduce heat transfer.
That means you can’t just size HVAC equipment the way you would in a standard build. Have a professional run proper load calculations based on actual insulation values and expected airtightness. Guessing leads to oversized equipment.
Oversized systems short-cycle. They blast your rooms with air and then shut off almost immediately. This wears out the equipment, fails to pull humidity out of the air, and leaves you with hot and cold spots. A right-sized HVAC system is steadier and keeps temperatures even from room to room.
Don’t forget about the ventilation system. Tight homes need controlled fresh air. Plan for a heat recovery ventilator (HRV) or energy recovery ventilator (ERV). These systems swap out your stale indoor air for fresh outdoor air without losing the heat you already paid for. In a SIP home, you’re building a house and a controlled environment.
Prioritize Airtight Detailing at Every Joint
The wall panels themselves are rock solid. They don’t leak. It’s the joints where your house can fall apart. If the seals aren’t perfect, you’ll waste your money on high-performance materials.
Every spot where two panels meet needs a clear plan. You need to specify where the foam sealant goes and where the SIP tape sits. Don’t just hope the crew knows what they’re doing. Draw it out on the plans. If you don’t see a bead of foam squishing out of a joint during installation, it’s probably not airtight.
Corners and roof-to-wall connections are the most common fail points. If you leave even a tiny gap, air will find it. When warm, wet air from your shower or kitchen sneaks into a cold gap in the wall, it turns into water. That water sits there and causes rot. So, you don’t just need a tight seal on the energy bill. It’s so your walls don’t succumb to moisture damage and wood rot a decade down the line.
Be Strategic With Windows and Doors
Glass looks great, but it transfers more heat than an insulated wall. When you design with SIPs, consider where those openings go. Every window interrupts the solid foam core. Each one requires extra framing and perfect sealing to keep the house airtight.
Orientation matters. In cold climates, putting glass on the south side helps catch the winter sun. In hot areas, too much glass on the west side will make your house overheat in the afternoon. Plan for roof overhangs or shading early in the design phase. It’s much harder to fix a heat problem after the walls are already up.
Don’t forget about the code requirements for window performance in your area, either. The U-values and solar heat gain ratings tell you exactly how the glass will perform. Cheap windows in a high-performance SIP wall create a weak link. Proper flashing and sealing around every frame are the only ways to prevent drafts and moisture damage over time.
Address Roof Design Carefully
The roof handles the most direct exposure to sun, rain, and snow. If you use SIP panels for your roof, you have to be even more careful than you were with the walls.
Keep the shape simple. Every time you add a valley or a weird angle, you add more seams that have to be taped and sealed. A complicated roof design will be challenging to build and may leak air and water if the crew misses a single detail.
You should also think about the weight. In areas with heavy snow or high winds, panels should be thick enough to handle the load. This isn’t the place to guess. You need an engineer to assess the plans to make sure the connections between the roof and walls are solid.
If those joints aren’t perfect, your energy efficiency will tank. Air will slip through small gaps you can’t see, and moisture will accumulate. Over time, that can damage finishes and reduce insulation performance. It creates expensive repairs, too.
Coordinate Electrical and Plumbing Early
Most SIPs come with pre-cut tunnels for your wiring. This is great, but it only works if you have your electrical plan ready before the factory starts building your house. If you decide to move an outlet after the panels show up, you’ll have to cut new chases into the foam yourself. That adds labor costs and can make a giant mess of your insulation.
For plumbing, try to keep supply lines in interior partitions. In cold climates, running water lines through an exterior SIP increases the chances of frozen and burst pipes. It’s smart to stack your bathroom and kitchen, too. It simplifies routing and reduces unnecessary penetrations.
The goal is to keep the panels intact. Every hole you drill or channel you cut is a spot where air can leak. You lose money every time the crew has to improvise or find a way to make the pipe fit while the construction is ongoing. It’s better to plan on paper so the installation goes fast and the house stays sealed tight.
Model Energy Performance Before You Build

You need all the facts if you’re serious about performance. Use energy modeling tools to see exactly how your house will handle the weather before you break ground. This simulation tells you how your windows, roof, and walls work together as a single unit.
You can test real scenarios. What happens if you increase roof insulation? What if you reduce west-facing glass? How much does exterior shading change cooling demand in July? Modeling shows how your decisions affect energy efficiency before the work begins. It also helps confirm that your HVAC system can handle the projected loads.
This step will help you stay aligned with local building codes on insulation levels and overall performance targets. When you see projected energy use laid out clearly, it’s easier to adjust the design while changes are still inexpensive and simple.
Once construction begins, even small revisions can be more costly and time-consuming. Reviewing solid data early gives you confidence that the house is designed to perform the way you expect it to, season after season.
Conclusion
Designing energy-efficient homes with SIPs takes intention. It needs coordination, detailing, and realistic expectations. You have to think through panel sizes, roof lines, mechanical systems, and every seam before construction begins.
When the design is tight and the installation is careful, the house performs the way it should. Comfort improves, energy waste drops, and your monthly bills stabilize.